Implementing Single Sign On with Google IDP
Published by Crhistian Ramirez-Hernandez on August 11, 2022
Last updated on July 23, 2024
OpenID Connect is a powerful feature that enables you to provide single sign-on capabilities for any identity provider that supports the specification. In this tutorial we'll walk you step by step through what you'll need to get single sign-on working by using Google as the identity provider. By the end of this tutorial, you'll be able to sign in via Google and be logged into OrderCloud.
Demo
Before we start, let's take a look at the finished product. Navigate to this website. You will be redirected to Google's sign-in page and after successfully signing in you should see your login details including:
Currently authenticated user
OrderCloud Access Token
OrderCloud Refresh Token (if configured)
Google ID Token
Create your Marketplace
First, you will need to create a new Marketplace.
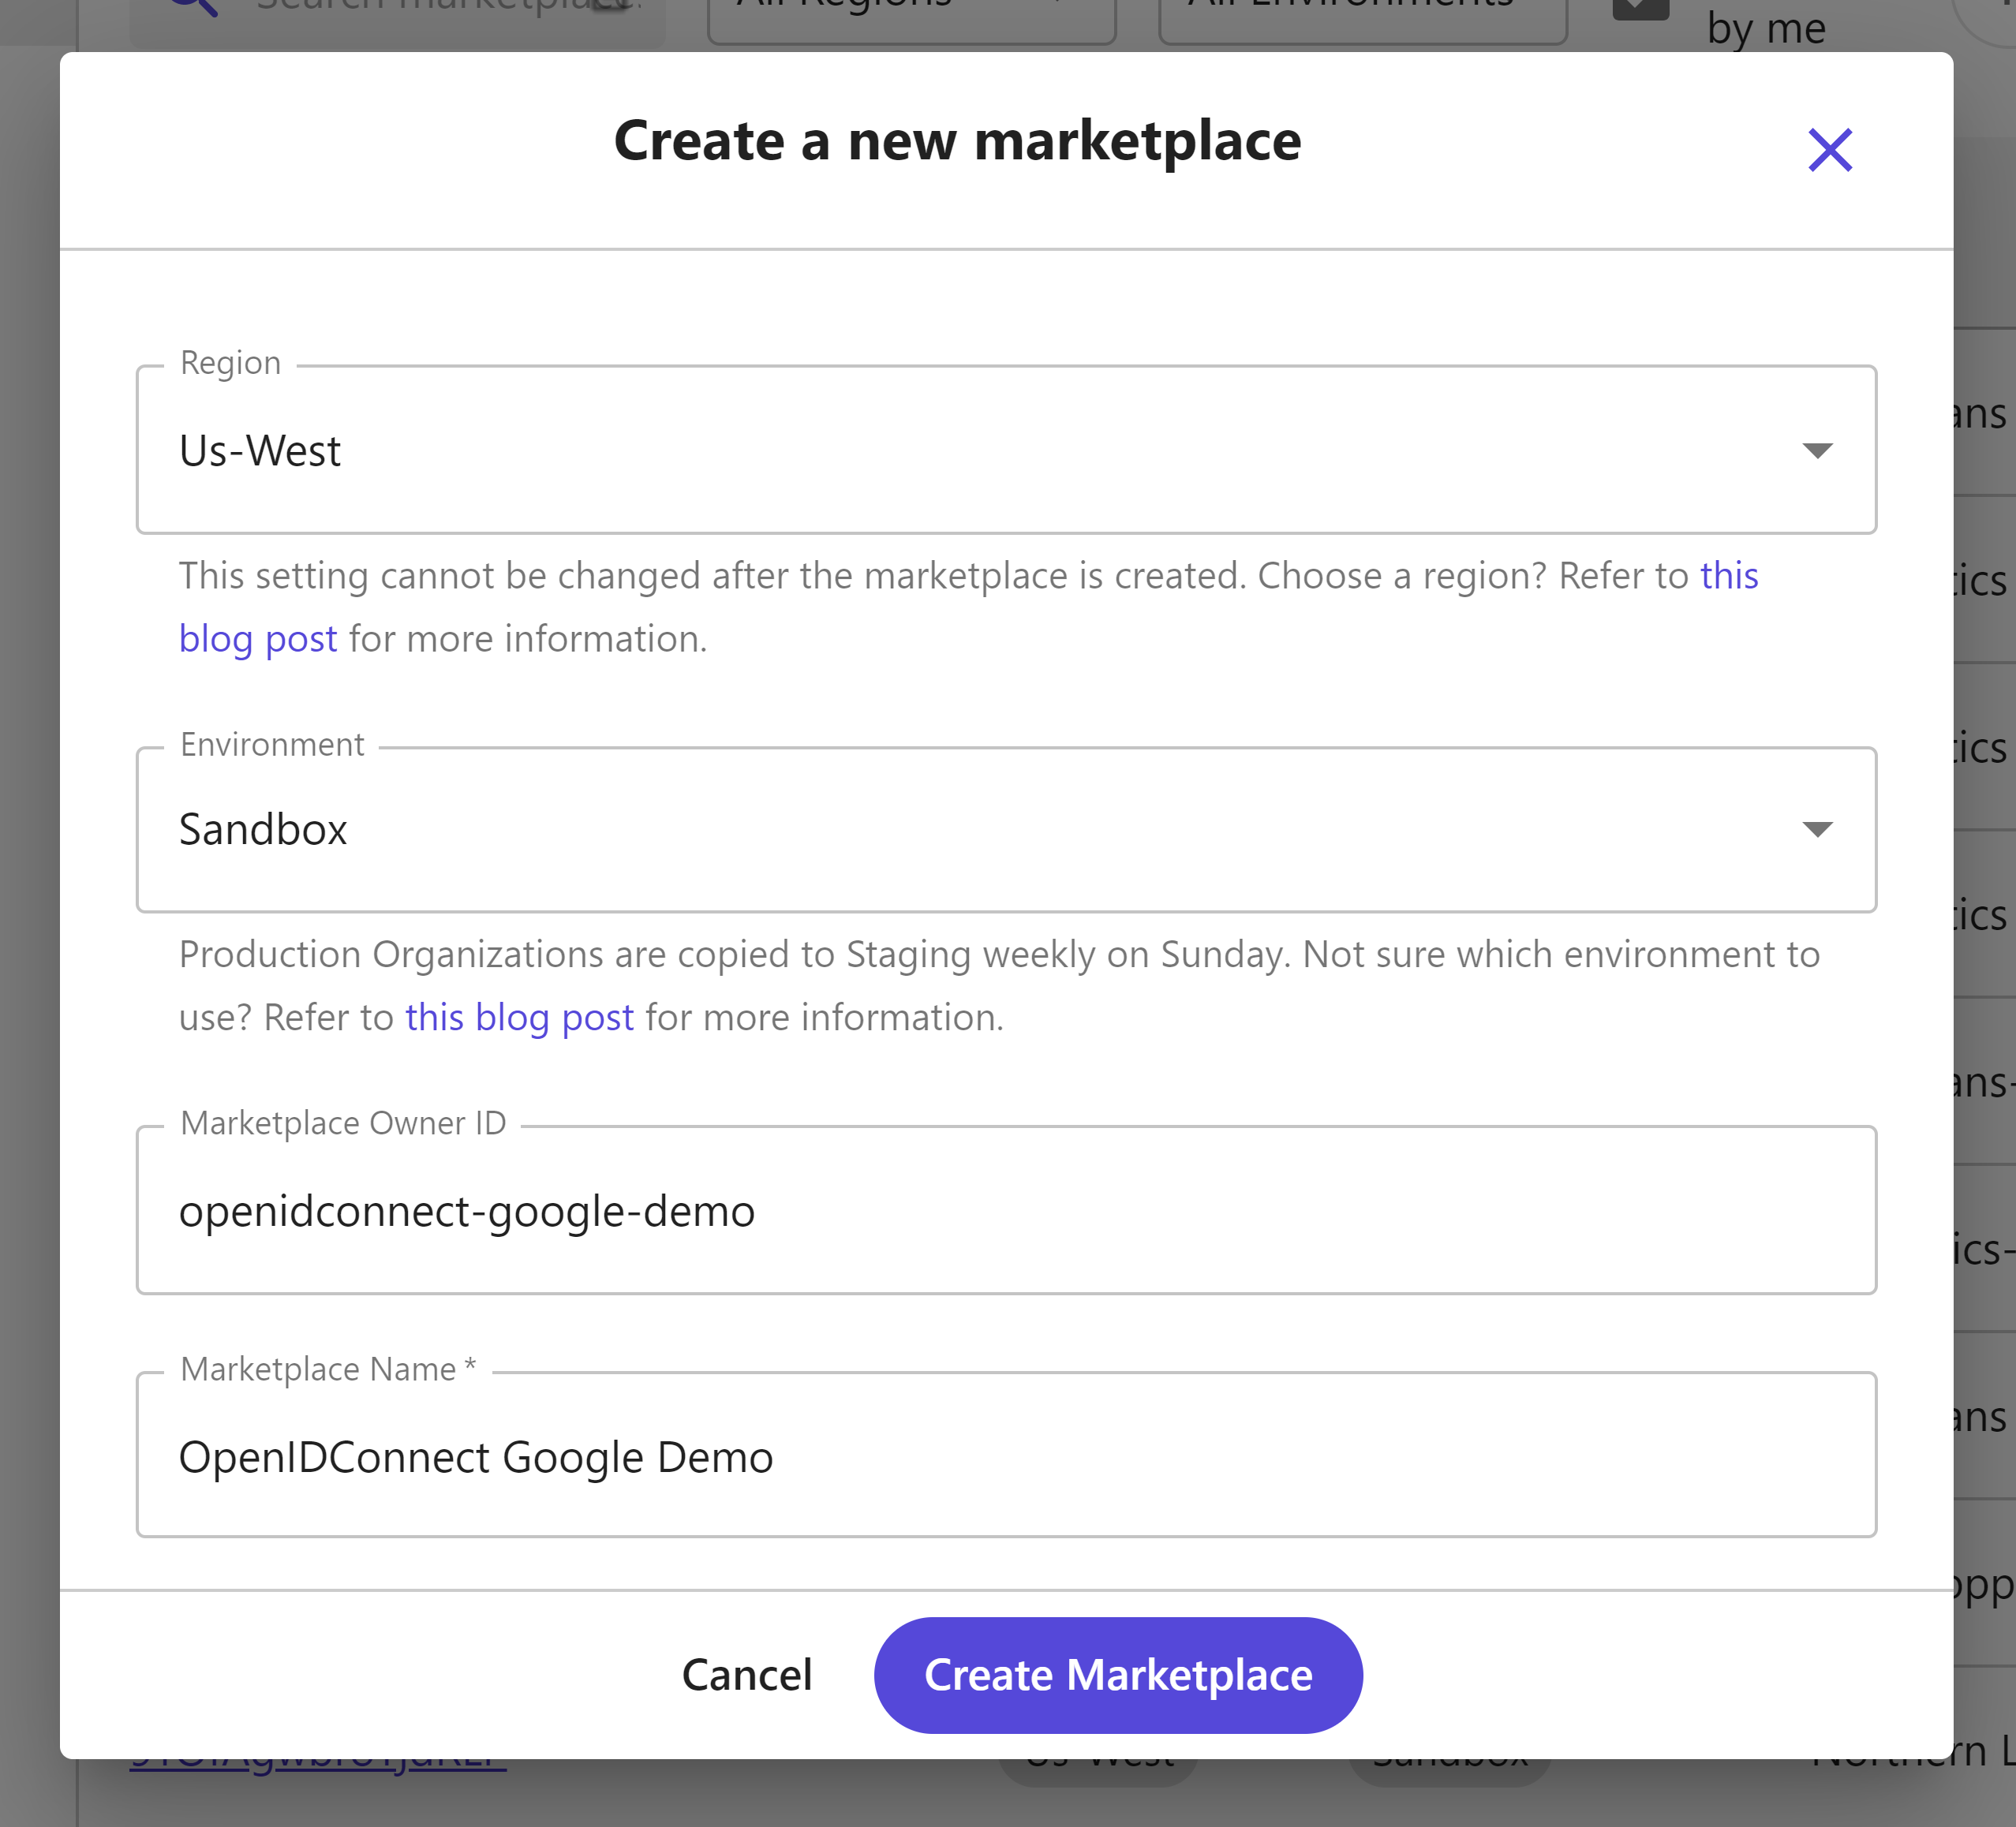
After creating it, take special note of the API server, this identifies the base URL needed for all API requests.
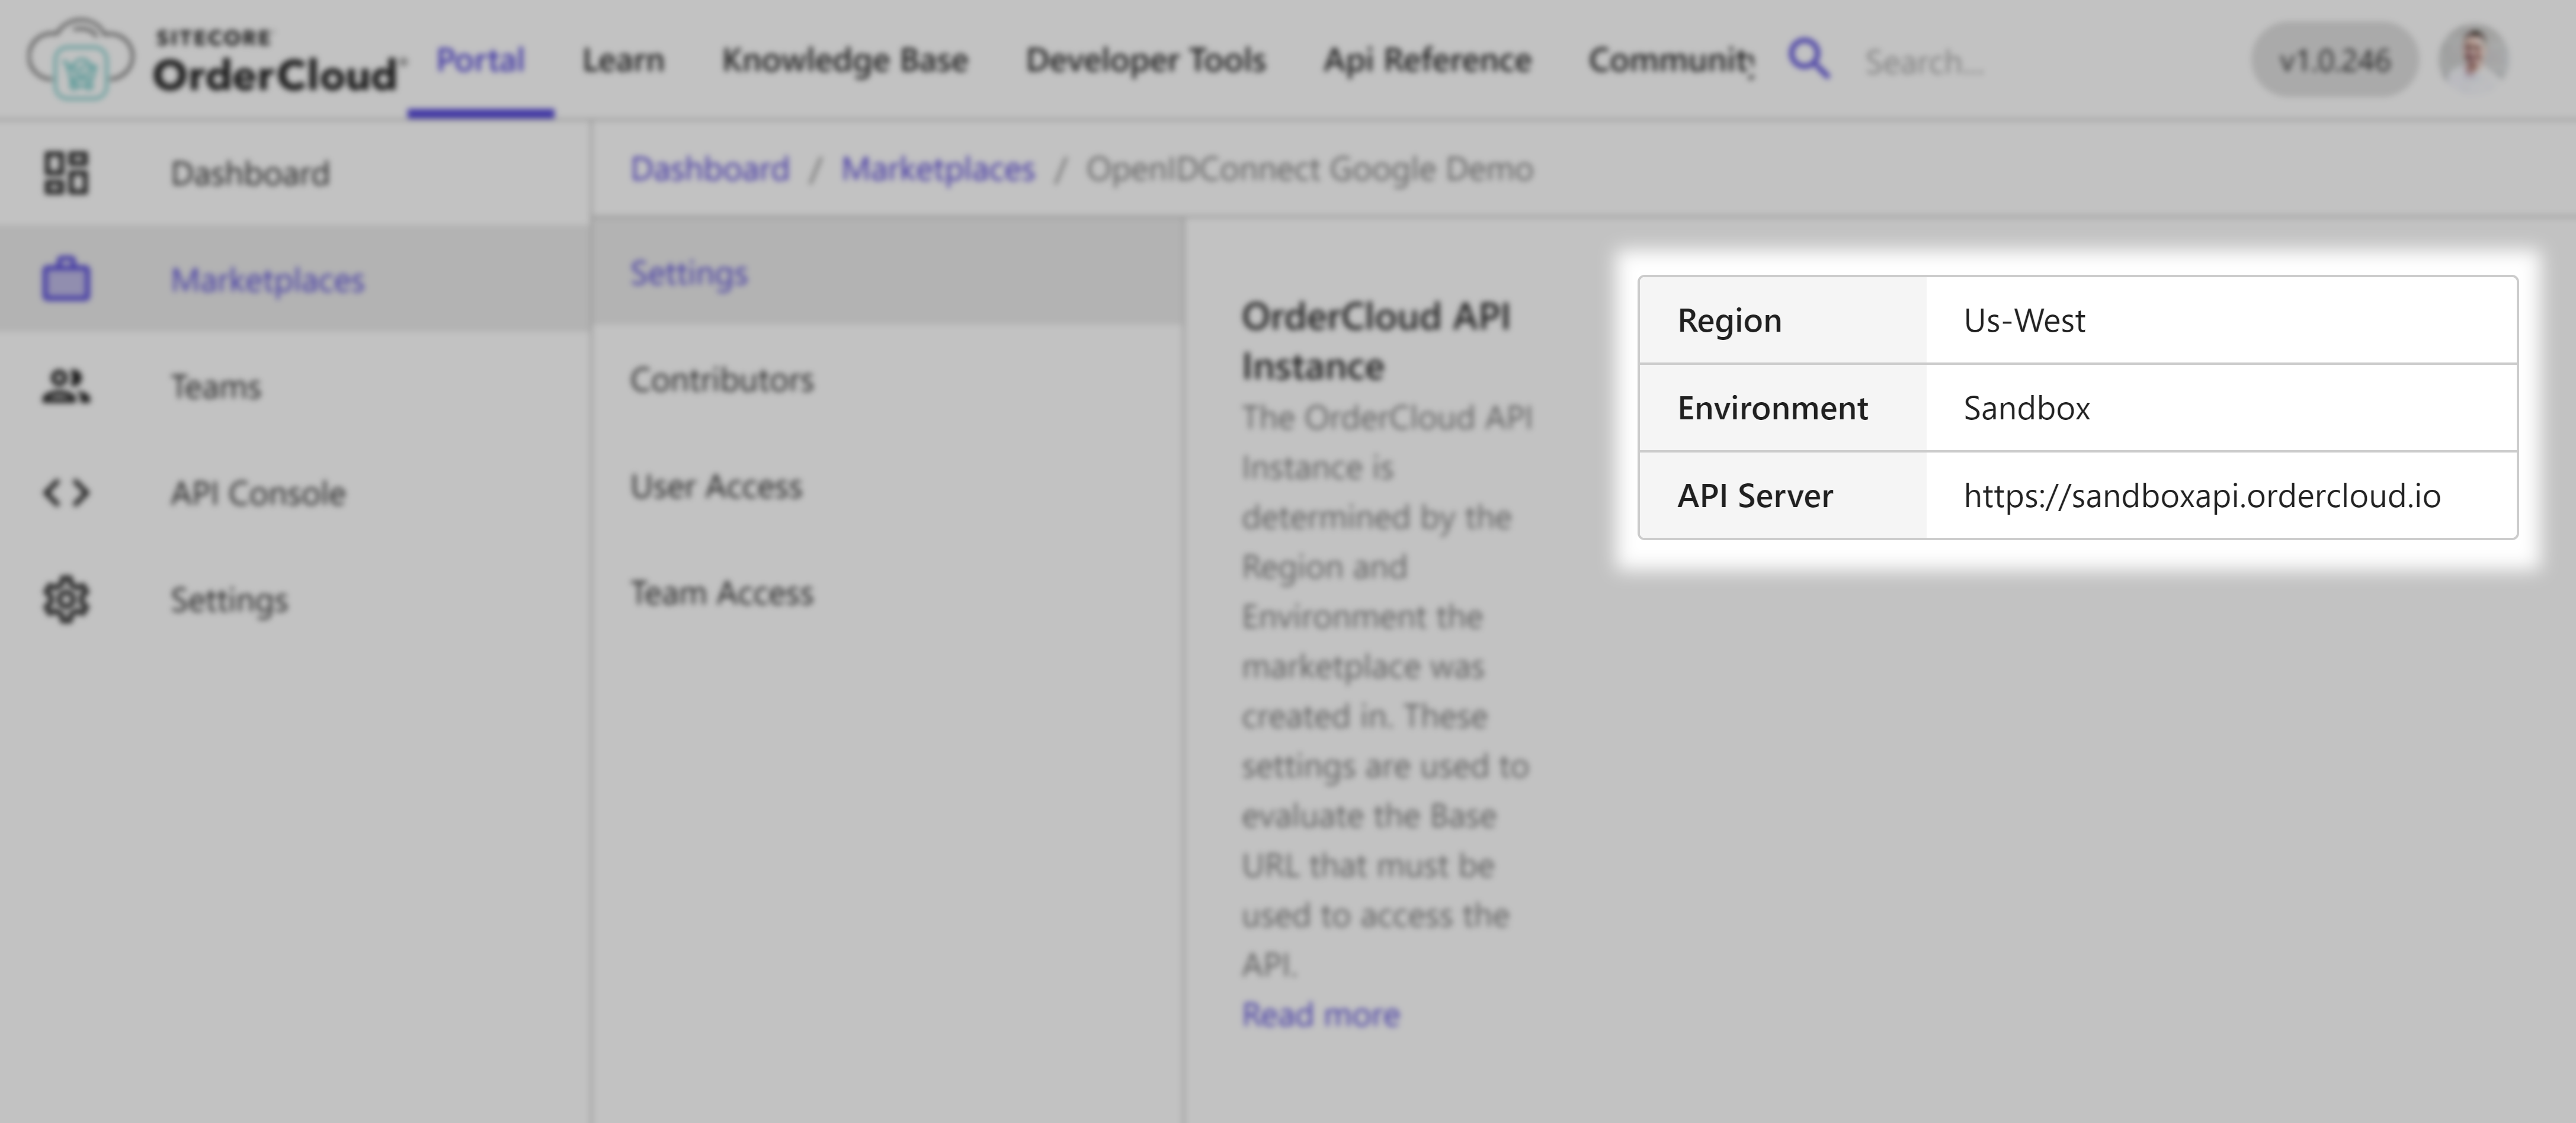
For this demonstration we are on the Sandbox environment in the region Us-West so our base API URL is https://sandboxapi.ordercloud.io, yours may look different.
Create supporting entities
We will be creating a single-sign-on experience for buyer users specifically, so we'll create the most basic OrderCloud entities required to support that scenario.
Create a buyer organization
1POST https://sandboxapi.ordercloud.io/v1/buyers HTTP/1.12Authorization: Bearer INSERT_ACCESS_TOKEN_HERE3Content-Type: application/json; charset=UTF-8;45{6 "ID": "buyer1",7 "Name": "Buyer 1",8 "Active": true9}
1import { Tokens, Buyers } from "ordercloud-javascript-sdk";23Tokens.Set("INSERT_ACCESS_TOKEN_HERE")45Buyers.Create({6 ID: "buyer1",7 Name: "Buyer 1",8 Active: true9})10.then(response => {11 // returns the newly created buyer organization12 console.log(response);13})14.catch(err => console.log(err));1516})
1import { Tokens, Buyers, Buyer, OrderCloudError } from "ordercloud-javascript-sdk";23Tokens.Set("INSERT_ACCESS_TOKEN_HERE")45const buyer: Buyer = await Buyers.Create({6 ID: "buyer1",7 Name: "Buyer 1",8 Active: true9})10.catch((err:OrderCloudError) => console.log(err));11console.log(buyer);
1using OrderCloud.SDK;23var client = new OrderCloudClient(...);45Buyer response = await client.Buyers.CreateAsync(new Buyer {6 ID = "buyer1",7 Name = "Buyer 1",8 Active = true9});
Create a Security Profile
1POST https://sandboxapi.ordercloud.io/v1/securityprofiles HTTP/1.12Authorization: Bearer INSERT_ACCESS_TOKEN_HERE3Content-Type: application/json; charset=UTF-8;45{6 "ID": "buyerProfile",7 "Name": "Buyer Security Profile",8 "Roles": ["Shopper"]9}
1import { Tokens, SecurityProfiles } from "ordercloud-javascript-sdk";23Tokens.Set("INSERT_ACCESS_TOKEN_HERE")45SecurityProfiles.Create({6 ID: "buyerProfile",7 Name: "Buyer Security Profile",8 Roles: ["Shopper"],9})10.then(response => {11 // returns the newly created security profile12 console.log(response);13})14.catch(err => console.log(err));1516})
1import { Tokens, SecurityProfiles, SecurityProfile, OrderCloudError } from "ordercloud-javascript-sdk";23Tokens.Set("INSERT_ACCESS_TOKEN_HERE")45const securityProfile: SecurityProfile = await SecurityProfiles.Create({6 ID: "buyerProfile",7 Name: "Buyer Security Profile",8 Roles: ["Shopper"],9})10.catch((err:OrderCloudError) => console.log(err));11console.log(securityProfile);
1using OrderCloud.SDK;23var client = new OrderCloudClient(...);45await client.AuthenticateAsync();67SecurityProfile response = await client.SecurityProfiles.CreateAsync(new SecurityProfile {8 ID = "buyerProfile",9 Name = "Buyer Security Profile",10 Roles = new ApiRole[] { ApiRole.Shopper }11});
Assign the security profile to the buyer organization
1POST https://sandboxapi.ordercloud.io/v1/securityprofiles/assignments HTTP/1.12Authorization: Bearer INSERT_ACCESS_TOKEN_HERE3Content-Type: application/json; charset=UTF-8;45{6 "SecurityProfileID": "buyerProfile",7 "BuyerID": "buyer1"8}
1import { Tokens, SecurityProfiles } from "ordercloud-javascript-sdk";23Tokens.Set("INSERT_ACCESS_TOKEN_HERE")45SecurityProfiles.SaveAssignment({6 SecurityProfileID: "buyerProfile",7 BuyerID: "buyer1"8})9.then(() => {10 // no response when security profile assigned11})12.catch(err => console.log(err));1314})
1import { Tokens, SecurityProfiles, OrderCloudError } from "ordercloud-javascript-sdk";23Tokens.Set("INSERT_ACCESS_TOKEN_HERE")45await SecurityProfiles.SaveAssignment({6 SecurityProfileID: "buyerProfile",7 BuyerID: "buyer1"8})9.catch((err:OrderCloudError) => console.log(err));
1using OrderCloud.SDK;23var client = new OrderCloudClient(...);45await client.AuthenticateAsync();67await client.SecurityProfiles.SaveAssignmentAsync(new SecurityProfileAssignment {8 SecurityProfileID = "buyerProfile",9 BuyerID = "buyer1"10});
Create an API client
1POST https://sandboxapi.ordercloud.io/v1/apiclients HTTP/1.12Authorization: Bearer INSERT_ACCESS_TOKEN_HERE3Content-Type: application/json; charset=UTF-8;45{6 "AccessTokenDuration": 600,7 "Active": true,8 "AppName": "Buyer Client",9 "RefreshTokenDuration": 43200,10 "AllowAnyBuyer": true,11 "AllowSeller": true12}
1import { Tokens, ApiClients } from "ordercloud-javascript-sdk";23Tokens.Set("INSERT_ACCESS_TOKEN_HERE")45ApiClients.Create({6 AccessTokenDuration: 600,7 Active: true,8 AppName: "Buyer Client",9 RefreshTokenDuration: 43200,10 AllowAnyBuyer: true,11 AllowSeller: true12})13.then((response) => {14 console.log(response);15})16.catch(err => console.log(err));1718})
1import { Tokens, ApiClients, ApiClient, OrderCloudError } from "ordercloud-javascript-sdk";23Tokens.Set("INSERT_ACCESS_TOKEN_HERE")45const apiClient: ApiClient = await ApiClients.Create({6 AccessTokenDuration: 600,7 Active: true,8 AppName: "Buyer Client",9 RefreshTokenDuration: 43200,10 AllowAnyBuyer: true,11 AllowSeller: true12})13.catch((err:OrderCloudError) => console.log(err));14console.log(apiClient);
1using OrderCloud.SDK;23var client = new OrderCloudClient(...);45await client.AuthenticateAsync();67ApiClient response = await client.ApiClients.Create(new ApiClient {8 AccessTokenDuration = 600,9 Active = true,10 AppName = "Buyer Client",11 RefreshTokenDuration = 43200,12 AllowAnyBuyer = true,13 AllowSeller = true14});
Make sure to record the ID from the response. You will need it when creating a new OpenID Connect
Configuring OIDC (OpenID Connect) via OrderCloud
Start ngrok
We'll need a publicly available endpoint. We can use a tool called ngrok to let us do this locally without having to deploy anything. After installing ngrok run the command ngrok http 3000. This tells ngrok to expose our endpoint (not yet running) on http://localhost:3000 to two public endpoints. After running the command copy either one of those URLs and record it, we'll need when creating a new OpenID Connect
Create the OpenID Connect Integration Event
1POST https://sandboxapi.ordercloud.io/v1/integrationEvents HTTP/1.12Authorization: Bearer INSERT_ACCESS_TOKEN_HERE3Content-Type: application/json; charset=UTF-8;45{6 "ID": "openidconnect",7 "Name": "openidconnect",8 "EventType": "OpenIDConnect",9 "CustomImplementationUrl": "{your-ngrok-url}/integration-events",10 "HashKey": "supersecrethash",11 "ElevatedRoles": ["BuyerUserAdmin"]12}
1import { Tokens, IntegrationEvents } from "ordercloud-javascript-sdk";23Tokens.Set("INSERT_ACCESS_TOKEN_HERE")45IntegrationEvents.Create({6 ID: "openidconnect",7 Name: "openidconnect",8 EventType: "OpenIDConnect",9 CustomImplementationUrl: "{your-ngrok-url}/integration-events",10 HashKey: "supersecrethash",11 ElevatedRoles: ["BuyerUserAdmin"],12})13.then(response => {14 // returns the newly created integration event15 console.log(response);16})17.catch(err => console.log(err));1819})
1import { Tokens, IntegrationEvents, IntegrationEvent, OrderCloudError } from "ordercloud-javascript-sdk";23Tokens.Set("INSERT_ACCESS_TOKEN_HERE")45const integrationEvent: IntegrationEvent = await IntegrationEvents.Create({6 ID: "openidconnect",7 Name: "openidconnect",8 EventType: "OpenIDConnect",9 CustomImplementationUrl: "{your-ngrok-url}/integration-events",10 HashKey: "supersecrethash",11 ElevatedRoles: ["BuyerUserAdmin"],12})13.catch((err:OrderCloudError) => console.log(err));14console.log(integrationEvent);
1using OrderCloud.SDK;23var client = new OrderCloudClient(...);45await client.AuthenticateAsync();67IntegrationEvent response = await client.IntegrationEvents.CreateAsync(new IntegrationEvent {8 ID = "openidconnect",9 Name = "openidconnect",10 EventType = IntegrationEventType.OpenIDConnect,11 CustomImplementationUrl = "{your-ngrok-url}/integration-events",12 HashKey = "supersecrethash",13 ElevatedRoles = new ApiRole[] { ApiRole.BuyerUserAdmin },14});
OrderCloud Property | Description |
|---|---|
| Unique identifier for the integration event |
| A short name describing the integration event, this is not user facing |
| Indicates what type of integration event this is, in our case we should use OpenIDConnect |
| This indicates the base URL of your middleware where OrderCloud should post to. For OpenIDConnect it will call out to the path |
| This is an important security feature that is used by your middleware to validate that requests made to your endpoints are legitimate and come from OrderCloud |
| An optional array of roles that will be encoded in the user's token and sent along in the payload to |
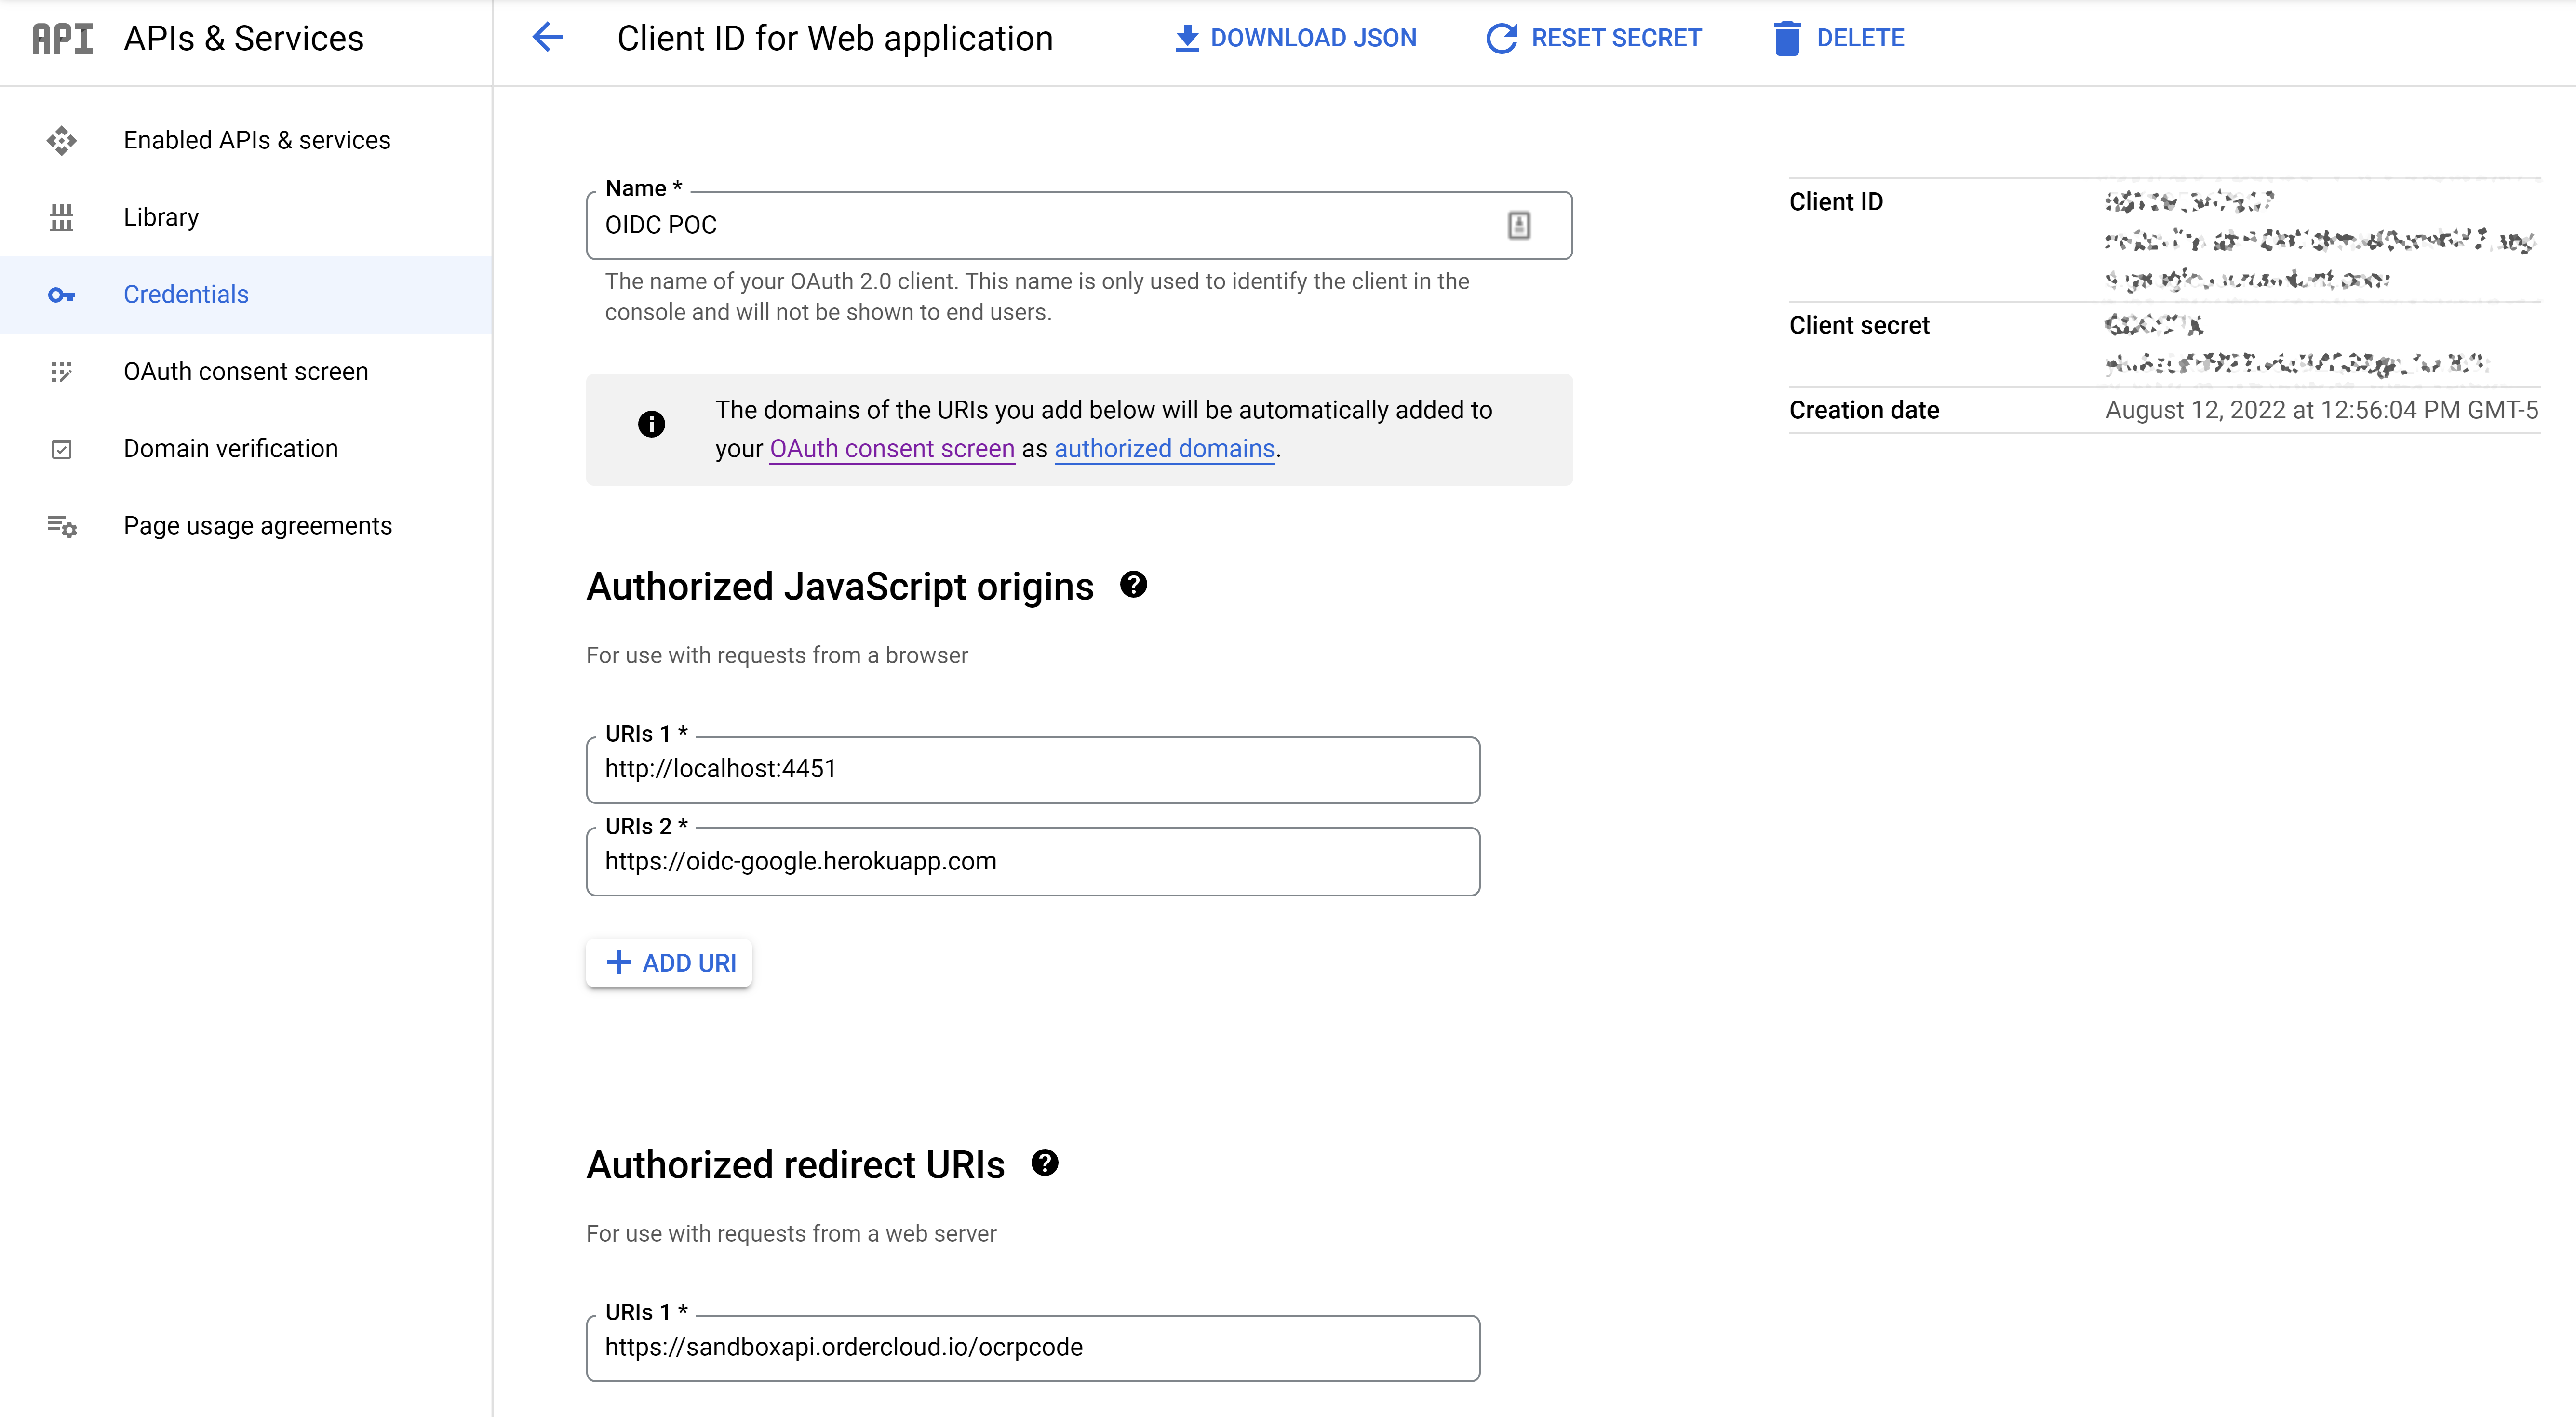
Configure Google
Follow Google's instructions for setting up OpenID Connect configuration on their side. You'll need to set the authorized redirect URI to {ordercloud_base_url}/ocrpcode. Take note of the clientID and clientSecret which OrderCloud will refer to as ConnectClientID and ConnectClientSecret respectively, these values will be needed in the following step.
Create a new OpenID Connect
This entity configures the connection between Google and OrderCloud.
1POST https://sandboxapi.ordercloud.io/v1/openidconnects HTTP/1.12Authorization: Bearer INSERT_ACCESS_TOKEN_HERE3Content-Type: application/json; charset=UTF-8;45{6 "ID": "google",7 "OrderCloudApiClientID": "CLIENT_ID_FROM_CREATING_API_CLIENT_STEP",8 "ConnectClientID": "GOOGLE_CLIENT_ID_HERE",9 "ConnectClientSecret": "GOOGLE_CLIENT_SECRET_HERE",10 "AppStartUrl": "http://localhost:3000?token={0}&idpToken={1}",11 "AuthorizationEndpoint": "https://accounts.google.com/o/oauth2/v2/auth",12 "TokenEndpoint": "https://oauth2.googleapis.com/token",13 "UrlEncoded": false,14 "CallSyncUserIntegrationEvent": true,15 "IntegrationEventID": "openidconnect",16 "AdditionalIdpScopes": []17}
1import { Tokens, OpenIdConnects } from "ordercloud-javascript-sdk";23Tokens.Set("INSERT_ACCESS_TOKEN_HERE")45OpenIdConnects.Create({6 ID: "google",7 OrderCloudApiClientID: "CLIENT_ID_FROM_CREATING_API_CLIENT_STEP",8 ConnectClientID: "GOOGLE_CLIENT_ID_HERE",9 ConnectClientSecret: "GOOGLE_CLIENT_SECRET_HERE",10 AppStartUrl: "http://localhost:3000?token={0}&idpToken={1}",11 AuthorizationEndpoint: "https://accounts.google.com/o/oauth2/v2/auth",12 TokenEndpoint: "https://oauth2.googleapis.com/token",13 UrlEncoded: false,14 CallSyncUserIntegrationEvent: true,15 IntegrationEventID: "openidconnect",16 AdditionalIdpScopes: []17})18.then(response => {19 // returns the newly created openidconnect20 console.log(response);21})22.catch(err => console.log(err));2324})
1import { Tokens, OpenIdConnects, OpenIdConnect, OrderCloudError } from "ordercloud-javascript-sdk";23Tokens.Set("INSERT_ACCESS_TOKEN_HERE")45const openIdConnect = await OpenIdConnects.Create({6 ID: "google",7 OrderCloudApiClientID: "CLIENT_ID_FROM_CREATING_API_CLIENT_STEP",8 ConnectClientID: "GOOGLE_CLIENT_ID_HERE",9 ConnectClientSecret: "GOOGLE_CLIENT_SECRET_HERE",10 AppStartUrl: "http://localhost:3000?token={0}&idpToken={1}",11 AuthorizationEndpoint: "https://accounts.google.com/o/oauth2/v2/auth",12 TokenEndpoint: "https://oauth2.googleapis.com/token",13 UrlEncoded: false,14 CallSyncUserIntegrationEvent: true,15 IntegrationEventID: "openidconnect",16 AdditionalIdpScopes: []17})18.catch((err:OrderCloudError) => console.log(err));19console.log(openIdConnect);
1using OrderCloud.SDK;23var client = new OrderCloudClient(...);45await client.AuthenticateAsync();67OpenIdConnect response = await client.OpenIdConnects.CreateAsync(new OpenIdConnect {8 ID: "google",9 OrderCloudApiClientID: "CLIENT_ID_FROM_CREATING_API_CLIENT_STEP",10 ConnectClientID: "GOOGLE_CLIENT_ID_HERE",11 ConnectClientSecret: "GOOGLE_CLIENT_SECRET_HERE",12 AppStartUrl: "http://localhost:3000?token={0}&idpToken={1}",13 AuthorizationEndpoint: "https://accounts.google.com/o/oauth2/v2/auth",14 TokenEndpoint: "https://oauth2.googleapis.com/token",15 UrlEncoded: false,16 CallSyncUserIntegrationEvent: true,17 IntegrationEventID: "openidconnect",18 AdditionalIdpScopes: []19});
OrderCloud Property | Description |
|---|---|
| Unique identifier for the connect client config |
| This is the clientID (on OrderCloud) that wants to authenticate via OpenID Connect |
| This is the clientID of the identify provider (in this case Google) |
| This is the clientSecret of the identity provider (in this case Google) |
| This is where the user will be redirected to after successful authentication via OpenID Connect. The parameter |
| Defined by the OpenID provider (in this case Google). It is the endpoint OrderCloud will redirect the user to in order to validate credentials. |
| Defined by the OpenID provider (in this case Google). It is the endpoint OrderCloud will call out to get a token from the provider. |
| How to post information to the OpenID provider (in this case Google). It is sent with either Basic Auth if UrlEncoded is |
| Whether or not the |
| The ID to the Integration Event created previously. This has information about which endpoint OrderCloud should call out to in order to create the user after the user has successfully logged in. |
| As defined by the OIDC specification we will request profile, email, and oidc scope but you may request any additional scopes you'd like to request from the IDP at the time of authentication. As an example, you could request permissions from Google to access the user's Google Drive files, then the access token you get back from the IDP would have permission to do that. Please note that these roles will show up in the user consent screen and best practices dictate to only request those that you absolutely need for your application |
Testing
OrderCloud and Google should now be completely configured, and you are ready to test to make sure everything is working. To simplify this aspect, we've created a very minimal frontend to test this functionality.
Clone this repository
Install dependencies by running
npm installat the root of the projectCopy
.env.exampleto.env.localRun the project by running
npm run start. This will start the server on port 3000. Remember ngrok is already listening to this port and will expose our endpoints publicly.Navigate to the url http://localhost:3000. If everything is correct you should be redirected to Google's login page. Upon signing in you will be redirected back to the application and should see details about your logged in user
Be sure to look at the /createuser and /syncuser endpoints
Common Issues
Error message: "error validating token with authority"
This issue occurs when OrderCloud attempts to retrieve the ID token from the IDP. This is generally a configuration issue. Confirm ConnectClientID, ConnectClientSecret, and OrderCloudClientID are correct.
Conclusion
By now you should have a solid understanding of how to implement single sign-on with Google and you should now feel empowered to build the same with any number of other identity providers such as Azure, or Auth0.
Still have questions?
Ask in our Community Channel